Tofu. If you’re an omnivore (and even if you’re a vegan or a vegetarian) you might love it, but you also might fear telling that to other people, because the tofu they see at the salad bar or in the package is white, watery, and tasteless. I first started eating tofu when I began to rely on Amy’s Kitchen meals to heat up for dinner during my crazy first year of law school. The meals were good, but not big enough for a proper dinner, and lacking in the amount of protein I craved. Bathed in tamale or enchilada sauce, the tofu was fine, and since it’s so much cheaper than the chicken or fish I would otherwise cook, it was perfect for a law student budget.
Since then, I’ve carved out time in my life to cook proper meals (though Amy’s are great for those nights when I’m hungry and in a hurry!) and discovered that tofu can, in fact, be appealing all on its own when made properly. My favorite way to eat tofu is when it’s baked or grilled and tossed with complementary foods for a hearty and delicious bowl. This is my first baked tofu recipe, a classic I return to time after time. I’ll pair it with quinoa, mushrooms, mirepoix, and Parmesan cheese for a satisfying dinner.

Baked Tofu with Parmesan Garlic Quinoa, Mushrooms + Mirepoix
Ingredients:
14 oz extra-firm tofu
2 tbsp brown rice vinegar
3 tbsp gluten-free tamari (soy sauce)
1 tbsp apple cider vinegar
2 tsp garlic powder
2 tsp dried thyme
1 tsp paprika
Olive oil (sprayable form preferable)
Instructions:
1. Slice tofu into 1″ thick slices and use dish towels to remove most of the moisture. Lie a towel flat on a plate, then arrange the tofu slices and place another towel on top, and press down. Repeat several times. (If you’re enough of a tofu aficionado that you own a tofu press to do this, then use that and I’m jealous of you.)
2. Cube the tofu slices into 1″ squares.
3. In a small bowl, combine the brown rice vinegar, tamari, and apple cider vinegar, along with 1 tsp each of the garlic and thyme.
4. Arrange tofu cubes in a plastic or glass container. Pour the marinade over the cubes and sprinkle remaining garlic and thyme on top. Cover the container, making sure it is well sealed, and shake a few times.
5. Place the container in the refrigerator and let sit for at least an hour, flipping it upside down halfway through the marinating process. Feel free to stretch out this step over several hours, or even overnight – it just needs at least an hour!
6. Grease the bottom and sides of an 8″ nonstick pan with olive oil. Place cubes evenly in the pan, ensuring that they aren’t on top of each other (squeezing the cubes in tightly is fine, they all just need to be touching the bottom of the pan).
7. Bake at 400 degrees Fahrenheit for 40 minutes. Turn off the oven, but let the dish sit in the oven for another 15-20 minutes to keep firm and warm. If you want to bake mushrooms with the tofu so they’re crispy, simply brush them with olive oil and put them on the tray when the tofu has 10 minutes left to bake.
8. Serve immediately on removing from the oven. Enjoy!
Serves 2-4 (for me, it’s two servings, but I like a protein-packed meal)
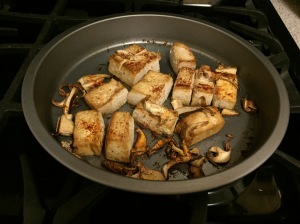
Baked Garlic & Thyme Tofu with Mushrooms
Do you try eating meatless every once in awhile, even if you’re an omnivore? What’s your favorite way to convince people that tofu is tasty?
© 2015 Renaissance Runner Girl. All rights reserved.


